Easter is a time for joyful celebrations, new beginnings, and, of course, delicious treats! While traditional fruit cakes and hot cross buns have their charm, nothing quite captures the festive spirit like a beautifully decorated chocolate Easter cake. This year, why not elevate your dessert game with a stunning speckled design, reminiscent of whimsical robin's eggs? It’s a technique that looks incredibly impressive but is surprisingly simple to achieve, making your Easter centerpiece truly unforgettable. Get ready to transform a humble chocolate cake into a work of art that will delight both young and old.
Crafting Your Canvas: The Perfect Chocolate Easter Cake Base
Before you can begin speckling, you need a delicious and sturdy foundation. A good chocolate Easter cake starts with a well-baked and properly iced cake. While some prefer a rich, dense fruit cake or even an unconventional Cruffin-style pastry, for this decorative technique, a classic sponge or mud cake provides the ideal smooth canvas.
A Quick Chocolate Easter Cake: Simple Victoria Sponge Recipe with chocolate buttercream is an excellent choice. The key is to ensure your cake is fully cooled and coated with a smooth, firm layer of icing. Chocolate ganache or a standard chocolate buttercream are perfect for this. Once iced, place your cake in the refrigerator for at least 30 minutes. This chilling step is crucial, as it firms up the icing, preventing smudges and ensuring a clean surface for the speckling process. A chilled cake also makes handling much easier.
Expert Tip: For the best results, aim for a very smooth final coat of icing. Any bumps or imperfections will be highlighted once the speckles are applied. A turntable can be your best friend here, allowing for even icing application and later, uniform speckling.
Mastering the Art of Speckling: A Step-by-Step Guide
The speckled effect is what truly makes this chocolate Easter cake stand out. It’s an artistic technique that brings a natural, rustic charm to your dessert. Don't be intimidated; with a little preparation and practice, you'll be creating beautiful speckles like a pro.
Preparation is Key: Setting Up Your Workspace
Anticipate a little mess, as speckling does involve some splatter. Protect your work area by covering your counter and even the wall behind with parchment paper, newspaper, or plastic wrap. This makes cleanup a breeze and allows you to focus on the fun part. Place your chilled, iced cake on a turntable, centered on your protected surface.
Whipping Up Your Speckling Mixture
The beauty of the speckling mixture lies in its simplicity. You'll need:
- 1 tablespoon of pure vanilla extract (or a clear alcohol like vodka for quicker drying)
- 1 teaspoon of unsweetened cocoa powder
In a small bowl, whisk these two ingredients together thoroughly until no lumps remain. The goal is a completely smooth, liquid consistency. If it's too thick, add a tiny bit more vanilla extract; if too thin, a pinch more cocoa. This concentrated cocoa mixture will create rich, natural-looking brown speckles that pop beautifully against a lighter chocolate or cream-colored icing.
Tools of the Trade: Your Speckling Arsenal
For application, you'll need two simple tools:
- A small, clean paintbrush: Choose one dedicated solely to baking projects. A stiffer bristle brush will give you more control over the splatter.
- A wooden spoon (or similar sturdy utensil): This will be your tapping surface.
The Speckling Technique: Aim, Tap, Rotate!
- Load the brush: Dip the paintbrush into your cocoa mixture, ensuring it's well coated but not dripping excessively. Tap the brush a few times gently against the side of the bowl to remove any large drips. This is crucial for achieving fine, delicate speckles rather than large blobs or blotches.
- Position and Tap: Hold the wooden spoon in one hand (your non-dominant hand typically works best for stability) a few inches above the cake. With your dominant hand, hold the paintbrush, pointing the bristles towards the cake. Gently tap the paintbrush handle against the wooden spoon. The force of the tap will cause the cocoa mixture to flick off the bristles and onto the cake in a fine spray.
- Rotate and Repeat: As you tap, slowly rotate the cake on the turntable. This ensures an even distribution of speckles across the entire surface. Vary the tapping intensity and distance to create a natural, organic look. Some areas might have denser speckles, while others are lighter.
- Assess and Adjust: Step back periodically to assess your progress. Continue speckling until you are happy with the density and coverage. Remember, you can always add more, but you can't easily remove them!
Pro Tip: If you're nervous, practice on a piece of parchment paper or a few cookies first. This will help you get a feel for the tapping motion and how much mixture to load onto your brush.
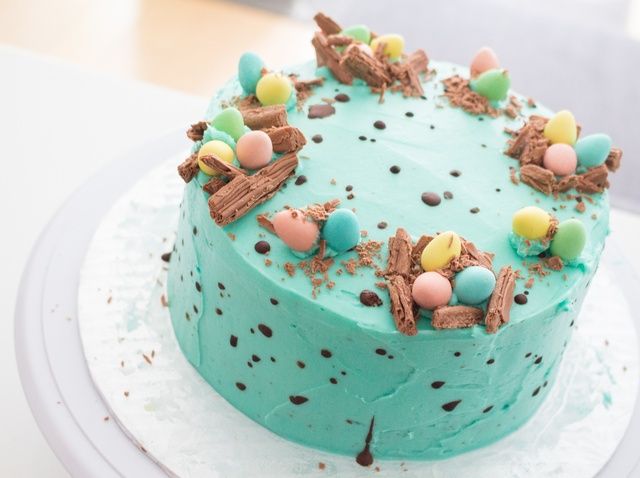
Decorating with Delights: Creating Charming Nests and Finishing Touches
Once your chocolate Easter cake boasts its beautiful speckled design, it’s time to add the final, enchanting elements: edible nests and vibrant mini eggs. These details truly bring the Easter theme to life.
Building Edible Nests: Options and Ideas
The nests are where the magic happens, providing a cozy bed for your colorful mini eggs. You have a few fantastic options:
- Cadbury Flake Nests: Crumbled Cadbury Flake bars create wonderfully light, airy, and realistic-looking nests with a delicate chocolate texture. Simply unwrap two or three Flake bars and gently crumble them into a bowl.
- Shredded Wheat Nests: For a more rustic, crunchy nest, mix crushed shredded wheat cereal with a little melted chocolate or chocolate icing. This binds the strands together, allowing you to shape them into small nest forms. You can even press them into silicon cupcake cases for perfectly shaped individual nests, then gently unmold them.
- Chocolate Icing Nests: If you have leftover chocolate icing, you can pipe small, circular nests directly onto the cake using a star tip, or simply spoon small dollops and use the back of the spoon to create an indentation.
For more creative ideas and detailed instructions on crafting these delightful features, check out our guide on DIY Chocolate Easter Cake Nests: Mini Eggs & Flake Ideas.
Arranging Mini Eggs and Embellishments
Once your nests are ready, it's time for the crowning glory: Cadbury Mini Eggs (or similar small, colorful chocolate eggs). Their vibrant hues contrast beautifully with the chocolate cake and speckles.
- Place the Nests: Gently arrange your crumbled Flake or shredded wheat nests in small clusters on top of the cake. If using individual prepared nests, place them strategically.
- Add the Eggs: Tuck a few Mini Eggs into each nest, pressing gently so they adhere to the cake's icing or the nest material. You can also scatter a few extra Mini Eggs around the base of the cake or directly on the speckled surface for added color and visual interest.
- Final Flourishes: Consider adding a few non-edible embellishments like small satin ribbons tied into bows, or sprigs of edible flowers for an extra touch of elegance. Just remember to remove any non-edible decorations before serving.
The result is a whimsical, inviting chocolate Easter cake that looks professionally decorated but carries the loving touch of homemade effort.
A Masterpiece for Your Easter Table
There’s immense satisfaction in creating something beautiful and delicious, especially when it becomes the centerpiece of your holiday celebration. This speckled chocolate Easter cake offers not only a delightful treat for the taste buds but also a stunning visual feast. The combination of rich chocolate, playful speckles, and charming mini egg nests evokes all the joy and wonder of springtime and Easter.
From the smooth, chilled icing base to the careful application of each speckle and the final placement of the edible nests, every step contributes to a truly unique dessert. So, gather your ingredients, unleash your inner artist, and prepare to impress your family and friends with an Easter cake that's as memorable as the holiday itself. Happy baking and happy Easter!
